So, in today’s article, I will be walking you through the induction hob installation guide! This installation guide applies to the built-in induction cooktops under the MDA group.
It is very important to understand that installing an induction cooktop is not that easy as you might think!
There are certain conditions and requirements that you’ll need to take into consideration!
With that said, I will try to make the explanation as simple and easy to understand.
And without further ado… let’s jump right into the topic!
Basic Induction Hob Installation Guide
The induction hob installation guide applies to built-in or integrated types of induction cooktops. This information is usually printed at the end part of the instruction manual, while others may provide a separate installation leaflet. It includes vital information such as the cut-out size, required installation distance, gaps, the minimum required thickness of the countertop, etc.
Ensure Correct “Cut-Out” Size is Outlined
As I have discussed in my previous article on how to choose an induction hob, I have reiterated the importance when deciding what size of induction hob you are going to take.
Ideally, what you will do is first buy the induction hob of your choice — then make the cut-out on the countertop based on that.
Once the cut-out size is outlined, you won’t be able to change mind, and say you would want another size of induction cooker.
If that happens, it means the countertop that you have just made will become wasted.
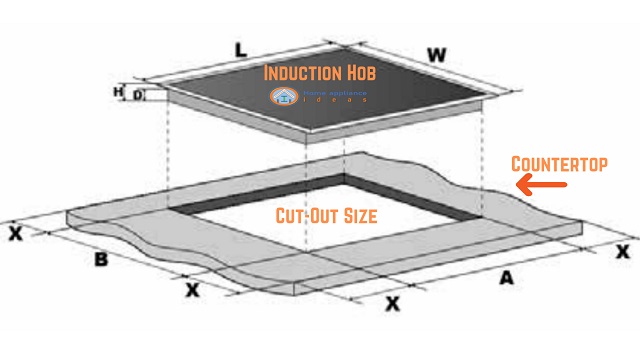
Below is an example illustration of how a cut-out is done on a countertop — basically, a hole is outlined for the induction hob to fit in.
So, make sure that the orientation of the induction hob must not be confused!
When making the cut-out — ensure to follow the instruction mentioned in the installation manual!
On top of that…
Also, make sure that the tabletop is level before installing the induction hob!
Required Gap between the Induction Hob and Countertop
When making a cut-out, the hole size will be smaller than the glass plate of the induction hob but should be slightly bigger than the bottom housing!
The extra distance is necessary during fitting!
You would not want to force your induction hob during installation — but if the size of the cut-out is just the same as the housing, then that will likely happen!
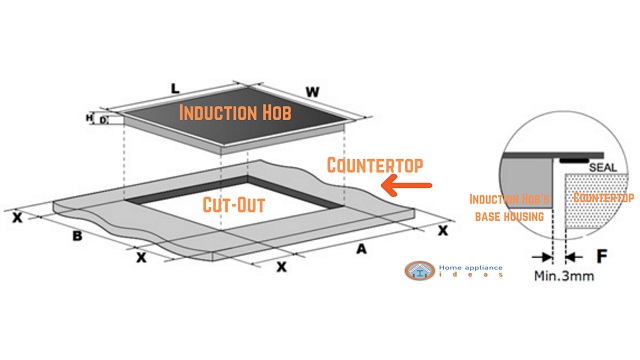
In the above example, you can see that the manufacturer’s requirement for the gap between the hob and countertop is minimum of 3mm.
Other’s require a minimum gap of 5mm.
So, depending on what brand you’ve grabbed, the required gap will be according to that brand’s standard!
Therefore, always refer to the installation instruction provided for your induction hob — as they’re all listed there!
Ensuring Adequate Ventilation
This is a critical aspect to the overall performance and lifespan of your induction hob!
Make sure to follow what’s the air (vent) gap required under the enclosure that houses your induction hob.
This is very important in order to release the heat that’s produced by the induction coils and accumulated inside during cooking!
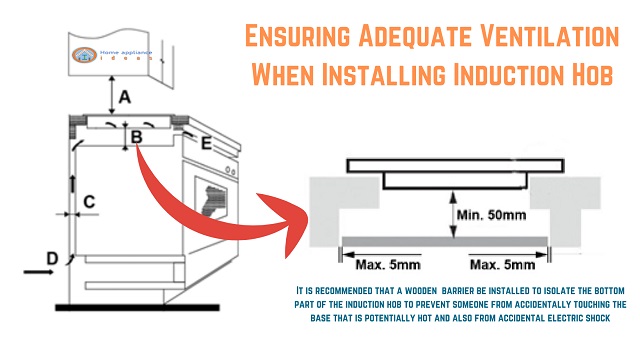
In the above example illustration, it is necessary to have air gaps that will enable the heat to be released to prevent overheating of the induction cooker!
For reference purposes, let me define the letters that are shown in the figure above:
- Distance A
- This is the distance from the top of induction hob to the cupboard.
- For this example, the manufacturers requirement is 760mm (different brands may have different standard).
- Distance B
- This is the distance required from induction hob’s base to the recommended wooden insert. And for this example, a minimum distance of 50mm is required by the manufacturer.
- The main purpose of the wooden insert is to ensure that no one will accidentally touch the base of the induction hob.
- Likewise, giving enough space for the hot air to circulate, and it also prevents the vent openings on the housing of the induction hob from getting blocked.
- The 5mm gaps on both sides of the wooden insert is for the air to pass through. So, the wooden insert should be fixed by screws with 5mm spacers in between. The required gap has to be followed if the design of the enclosure is similar as the figure on the right side!
- Distance C
- In this example, the manufacturer requires a minimum of 20mm gap between the enclosre that will allow the air to flow.
- Distance E
- The manufacturer requires a minimum gap of 5mm at the front part of the cabinet (if the design of the enclosure is similar as illustrated).
The above specifications are based on one manufacturer that I have collaborated during product development while still working in a company for home appliance segment!
And as I have earlier said, other brands may have different requirements — so, always refer back to the supplied installation instruction!
Tabletop Minimum Thickness and Material Type
Besides selecting what kind of material your countertop will be, you must also consider that there’s a minimum requirement for the thickness!
Below are conditions that you must consider when selecting material for your countertop.
- Your countertop must have at least minimum thickness of 30mm!
- Select a heat-resistant countertop (i.e., most commonly used tabletops are granite and ceramic tiles)
- Avoid using wood and similar fibrous and hygroscopic material as your tabletop (as this type of materials are more susceptible to physical/property change caused by heat and moisture).
Mains Cable Must Handle Maximum Load
This is a critical part of the installation process that ONLY a qualified person should be allowed to do!
However, if the electrical wirings were pre-installed by a qualified electrician —
then it’s safe to say that the electrical wirings had been accurately regarded to be able to handle maximum current load — based on the size of your house.
That they’ve estimated all possible appliances you could have, and were included in the computation to get the maximum load that the electrical cable could handle!
And…
The electrical design is according to your local electrical code or standard and regulations!
So, that’s for your house’s electrical wirings – it’s taken cared of!
Now, let’s move on to your induction hob’s mains cable.
As a safety precaution — built-in induction hob’s power cord does not include the plug!
First reason, built-in induction hobs are fixed!
Secondly, the wire’s cross-section are bigger which is not ideal to have a plug at the end!
AC power cords are verified by the manufacturers before they’re used — this is a critical component that must not be compromised!
Because using an underrated power supply cable could result to fire!
Simple way to determine if the power supply cable is suitable —
Check the maximum power rating of your induction hob (this can be found at the rating plate or in the instruction manual) , then divide it by the voltage source!
The result is the load current that the power cable should be able to handle!
For example:
Induction Hob max rated power (W): 3000W
Local voltage source (V): 230V
Resulting current amperage (A): 3000W ➗ 230V = 13 amperes
In this case, the manufacturer cannot use a 10A mains cable because it will be underrated.
Instead, the manufacturer MUST use a 16A cable — for SAFETY reasons!
If you want to check the amperage rating of the power cable of your induction hob, it’s printed or etched on the cable’s insulation material!
Connecting Induction Hob to the Mains Power Supply
Fixing electrical wirings needs expertise, and if you don’t have any experience — don’t do it by yourself!
There’s good news, however…
Because installation services are usually included when you buy a product such as built-in induction hob.
In case there’s no offered support service for installation — you have no other choice but to hire a professional!
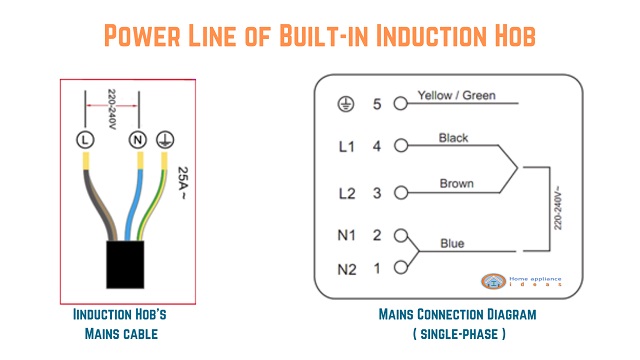
Above illustration is an example of the power supply cable, and connection diagram of an induction hob!
A single-phase connection normally is all that’s needed!
A three-phase connection will only be recommended and will be specified (in the installation instruction) if it’s necessary! So, check the installation manual before proceeding with the actual installation!
The example above is for a 230V power source!
If you are installing an induction hob for a 120VAC power source, please only follow what’s being instructed in the installation instruction!
Below are SAFETY precautions to take note of when installing an induction hob to the mains power supply!
- The rated voltage of the induction hob is the same as the voltage source!
- The power supply cable can withstand the maximum power load specified on the rating plate!
- The domestic wiring system is suitable for the power drawn by the induction hob!
- Check with electrician whether the domestic wiring system is suitable without alteration — any alteration must only be made by qualified electrician!
- DO NOT use adapters, reducers, or branching device as they can cause overheating and fire!
- The power supply cable must not touch any hot part!
- The power supply cable must be properly fixed away from hot surface!
- Contact aftersales agent if the power supply cable is damaged or to be replaced!
- Install a suitable circuit-breaker with 3mm air gap between contacts if the induction hob is being connected directly to the mains!
- The installer must ensure correct connection and in compliance with safety regulation!
- Ensure the power supply cable is not bent or pinched!
- The power supply cable must be checked regularly and should be replaced by authorized technicians only!
Checkpoints Before and After Installation
Foremost, a word of CAUTION! — DO NOT install the induction hob directly above a dishwasher, fridge, freezer, washing machine, or clothes dryer!
So, moving on… below are important checking points before and after induction hob installation!
Before installing the Induction Hob
- Ensure the tabletop is level and no structural damage!
- The tabletop is made of heat-resistant material!
- Make sure that the installation will comply with all the clearance requirements!
- Ensure that the installation will comply with the relevant standards and regulation!
- A suitable isolating switch is properly installed and integrated according to the local electrical standard and regulations, and is easily accessible!
- You have done due deligence by consulting local building authorities when in doubt about the installation!
After installing the Induction Hob
- Make sure that the power supply cable is not accessible through cupboard doors or drawers!
- Ensure there is an adequate flow of fresh air from outside and through the created gaps going to the base of the induction hob!
- If the induction hob is installed above a drawer or cupboard space — a heat-resistant protection barrier or insert shall be installed below to isolate the base and prevent the end user from accidentally touching the bottom of the induction hob!
- Make sure that the isolating switch is easily accessible for end user!
Induction Hob Installation FAQs
What are the Installation Requirements for an Induction Hob?
- Installation requirements may vary according to the Brand and Design of induction Hobs, as different manufacturers have their own standards to follow.
- And as I have explained above, the one thing to look out for is that the installation must comply with the local standard and regulations!
Do induction hobs need special wiring?
- YES, the wiring will depend on the design of the induction hob!
- Induction hob with very high power will need bigger wires to handle the load (see my explanation above).
- Likewise, connecting it to the mains supply may need three-phase rather than a single-phase connection.
Do I need an electrician to install an induction hob?
- No and Yes!
- No, if installation is covered by the dealer where you purchased your induction hob — what they will do is send their qualified personnel to do the installation for you! So, it’s better to ask your dealer if they also cover the installation!
- Yes, you’ll need the help of a qualified electrician to install your induction hob if the installation is not included in the package when you buy your induction hob!
How much space do you need under an induction cooktop?
- Minimum 50mm!
- As shown in the illustration above (Distance B), some manufacturers require a minimum of 50mm distance between induction hob’s base — making sure it’s a free space!
- There shouldn’t be any other things found inside that space to prevent the induction hob’s vents from being blocked!
Do you need ventilation for induction cooktop?
- Yes, if your’re installing your induction hob above a drawer or a cupboard space — there are required gaps that needs to be created for the air to flow (in and out)!
- See my explanation above for ensuring adequate ventilation!
Do I need 3 phase power for induction cooktop?
- Not necessary unless your induction cooktop has very high power and if the installation instruction recommends using a three-phase connection!
Can I install an induction hob myself?
- If you are not a qualified electrician, the answer is NO!
- Installing an induction hob is not simple, and must be done only by qualified individuals because it must comply with the relevant standard and regulations!
Final Thoughts
I have covered and explained the basic induction hob installation guide!
Also, you must be aware by now that the installation instruction of an induction hob can be seen in the instruction manual (normally at the back page)!
While other suppliers may provide a separate installation leaflet showing all the details and the step by step installation process!
Here are important takeaways when installing an induction hob:
- Installation must be done “only” by a qualified person!
- Ensure that the installation complies with the local standard and regulations!
- Use heat-resistant material for your tabletop
- Ensuring adequate ventilation for your induction hob
- Read and undertand carefully the instructions provided in the installation manual to avoid making mistake (e.g., cut-out size outline)
So, there you have it, folks!
I hope you will find this piece helpful!
If you have any questions or suggestions, or if you feel some information is lacking…
please leave them in the comments below, and I will answer them as soon as I can and to the best of my knowledge.
Thanks!
Rowe Medialdea
I'm experienced in Quality Control with a working history in the Consumer Electronics and Home Appliance industry. I have created this website to share my gained knowledge and be of help!